Creating a website can seem like a daunting task, but with WordPress, it’s much easier than you might think! In this tutorial, I’ll walk you through the process step-by-step, helping you design a beautiful and functional website, whether it’s for a blog, portfolio, or online store. Let’s get started!
Step 1: Understanding WordPress
First off, let’s talk about what WordPress is. It’s a content management system (CMS) that powers a significant portion of the web (over 44% to be precise!). You have two options here:
- WordPress.com: A hosted platform that’s simpler but comes with limitations.
- WordPress.org: A self-hosted platform where you get full control and flexibility, which is what we’ll focus on in this tutorial.
Step 2: Getting Your Domain Name and Hosting
Before we dive into the design, you’ll need a couple of essentials:
- Domain Name: This is your website’s address (like www.yourwebsite.com).
- Web Hosting: This is the service that stores your website’s files and makes them accessible online.
There are many great hosting providers out there, such as Bluehost, SiteGround, or HostGator. Many of them offer easy WordPress installation and often throw in a free domain name for the first year. Score!
Step 3: Installing WordPress
Once you’ve secured your domain and hosting, it’s time to install WordPress:
- One-Click Installation: Most hosting providers have a one-click installation option—easy peasy!
- Manual Installation: If you’re feeling adventurous, you can download WordPress from WordPress.org, upload it to your hosting server, and set up a database.
After installation, you can log in to your WordPress dashboard by visiting www.yourwebsite.com/wp-admin.
Step 4: Choosing a Theme
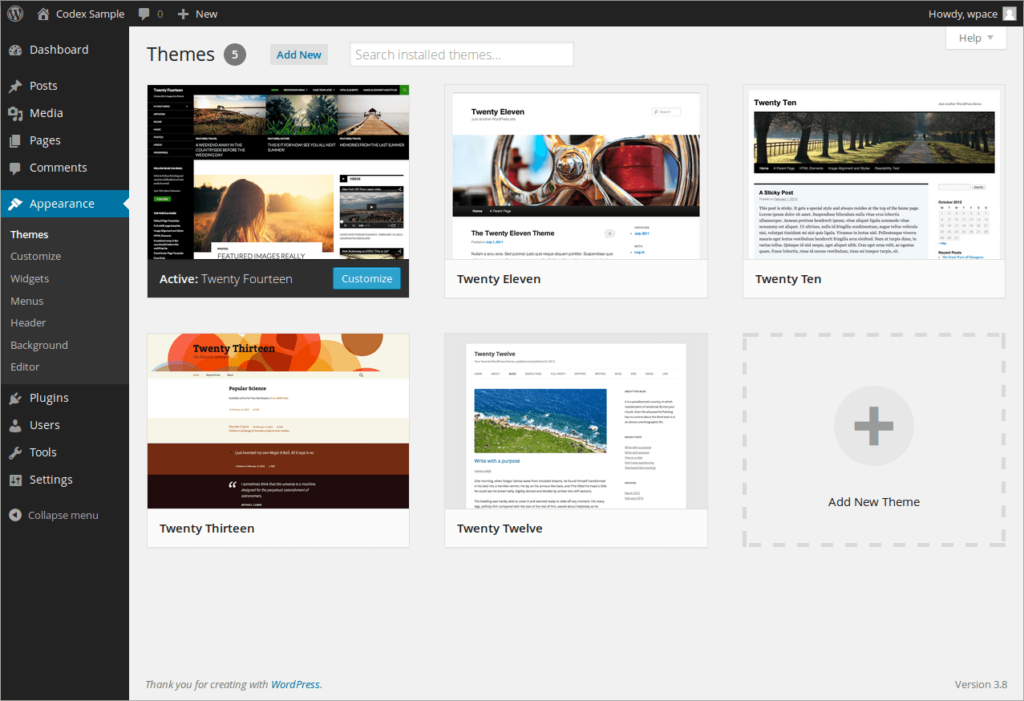
The theme you choose will dictate how your website looks and feels. Thankfully, WordPress offers a plethora of options:
- Head over to Appearance > Themes in your dashboard.
- Click Add New to browse through themes that catch your eye.
- Preview and install a theme that fits your vision.
If you’re unsure where to start, themes like Astra, OceanWP, or Neve are fantastic choices—they’re user-friendly and highly customizable!
Step 5: Customizing Your Website
Now it’s time to make your site truly yours:
- Go to Appearance > Customize. This will open up a live preview of your site.
- Here, you can modify elements like:
- Site Identity: Add your logo, site title, and tagline.
- Colors: Choose a color palette that reflects your brand.
- Typography: Pick fonts that match the vibe of your site.
- Header and Footer: Customize the layout and contents to make them functional and attractive.
Many themes even allow you to import demo content to kickstart your design!
Step 6: Adding Essential Plugins
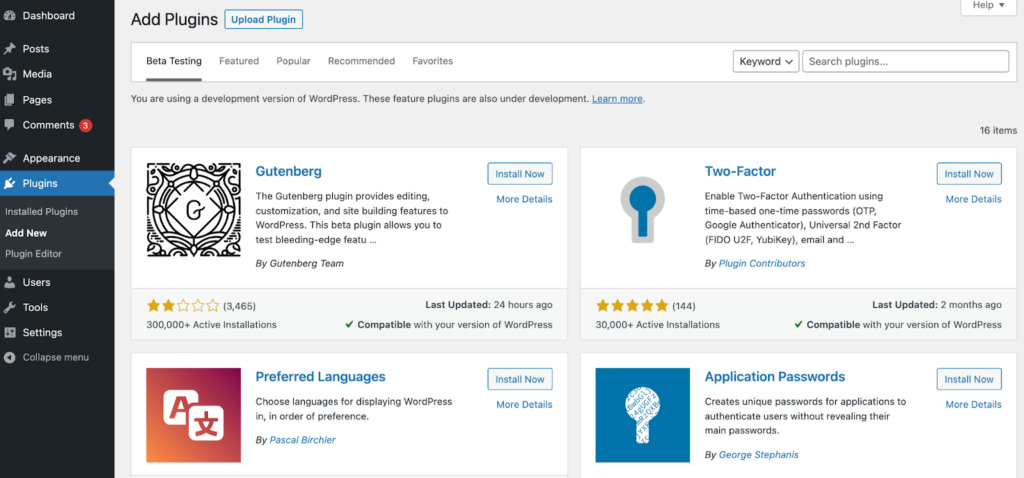
Plugins are like apps for your website—they extend its functionality. To install plugins:
- Go to Plugins > Add New.
- Search for the plugin you want and hit Install Now.
- Don’t forget to activate it!
Here are a few must-have plugins to consider:
- Yoast SEO: Helps you optimize your site for search engines.
- Elementor: A drag-and-drop page builder that makes designing pages a breeze.
- WooCommerce: Perfect for setting up an online store.
- Contact Form 7: Great for adding contact forms to your site.
Step 7: Create Pages and Content
After you’ve added your pages and posts, it’s essential to organize and enhance your content for better user engagement and SEO.
- Organizing Content:
- Categories and Tags: Use categories to group related posts and tags for more specific topics. This helps visitors navigate your blog easily.
- Menus: Ensure your main navigation menu includes links to your most important pages, such as Home, About, Blog, and Contact.
- Using the Block Editor:
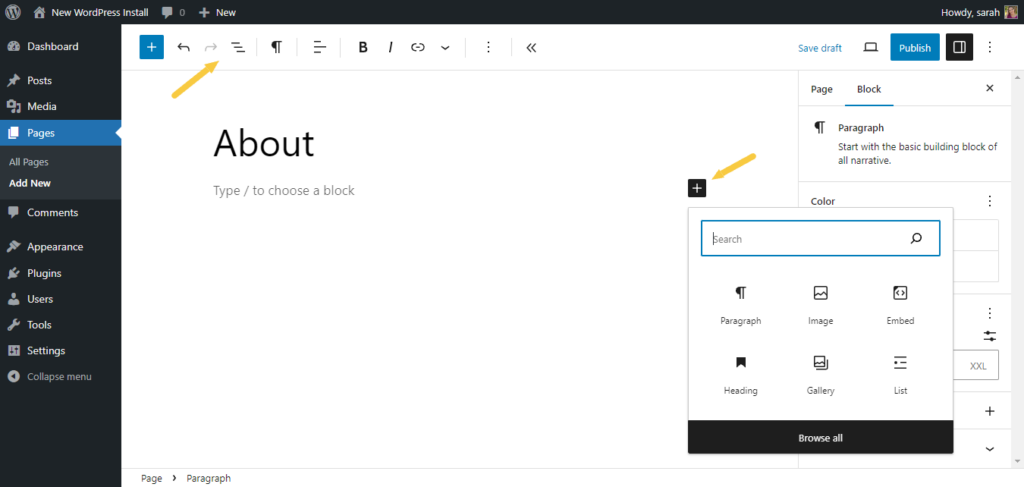
- The Block Editor (Gutenberg) allows you to create content using blocks for different elements like paragraphs, images, galleries, and more.
- To add a block, click the + icon and choose the type of block you want to insert. You can also drag and drop blocks to rearrange them.
- Enhancing Content:
- Images and Media: Use high-quality images to make your content visually appealing. You can add images by clicking on the image block and uploading files from your computer or selecting from the media library.
- Embedding Content: You can embed videos, social media posts, and other content by pasting the URL directly into a block. WordPress will automatically convert it into an embedded format.
- Creating a Blog:
- If you plan to have a blog, consider creating a dedicated blog page. You can set this up by going to Settings > Reading and selecting your blog page as the posts page.
- Regularly update your blog with fresh content to keep your audience engaged and improve your SEO.
Step 8: Set Up Menus
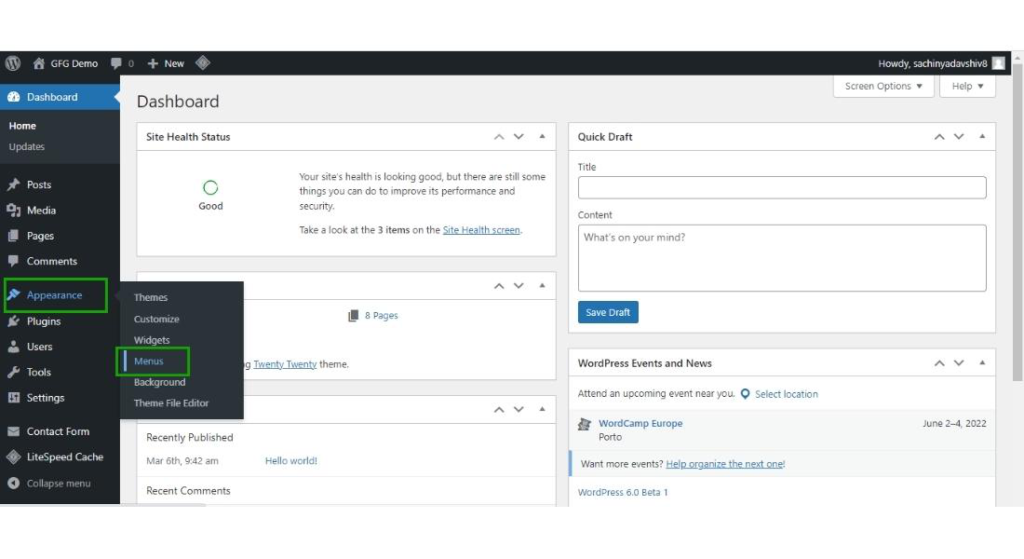
Creating a user-friendly navigation menu is crucial for helping visitors find their way around your site.
- Creating a Menu:
- Go to Appearance > Menus.
- Enter a name for your menu and click Create Menu.
- Add pages, posts, categories, or custom links to your menu by selecting them from the left side and clicking Add to Menu.
- Organizing Menu Items:
- You can drag and drop menu items to arrange them in your preferred order.
- To create submenus, drag an item slightly to the right under another item.
- Assigning Menu Locations:
- After organizing your menu, assign it to a location (e.g., Primary Menu) based on your theme’s options.
- Save your menu to apply the changes.
Step 9: Optimize and Launch
Before launching your website, it’s important to optimize it for performance and user experience.
- Testing Responsiveness:
- Check how your website looks on different devices (desktop, tablet, mobile). You can use the responsive design mode in your browser’s developer tools or tools like Google’s Mobile-Friendly Test.
- Improving Speed:
- Use caching plugins like WP Super Cache or W3 Total Cache to enhance loading times.
- Optimize images using plugins like Smush or Imagify to reduce file sizes without losing quality.
- Setting Up Analytics:
- Install Google Analytics to track visitor behavior. You can use plugins like MonsterInsights to easily integrate Google Analytics with your WordPress site.
- SEO Optimization:
- Use an SEO plugin like Yoast SEO to optimize your content for search engines. This plugin helps you with keyword optimization, readability analysis, and generating XML sitemaps.
- Final Checks:
- Review all pages for broken links, typos, and formatting issues.
- Ensure that your contact forms are working correctly and that you receive submissions.
Step 10: Maintain Your Website
After launching, ongoing maintenance is essential to keep your website running smoothly.
- Regular Updates:
- Keep WordPress, themes, and plugins updated to ensure security and functionality. You can check for updates in your dashboard under Dashboard > Updates.
- Backups:
- Regularly back up your website using plugins like UpdraftPlus or BackupBuddy. This ensures you can restore your site in case of any issues.
- Monitor Performance:
- Use tools like Google PageSpeed Insights or GTmetrix to monitor your site’s performance and identify areas for improvement.
- Engage with Your Audience:
- Respond to comments on your blog and engage with your audience on social media. This helps build a community around your website.
- Analyze Traffic:
- Regularly review your Google Analytics data to understand your audience’s behavior and adjust your content strategy accordingly.
Conclusion
Congratulations! You’ve successfully designed and launched your WordPress website. By following these steps, you now have a platform to share your ideas, showcase your work, or run a business. Remember, the key to a successful website is continuous improvement and engagement with your audience. Enjoy your journey in the world of WordPress!
